

900mm Clearance: Kitchen Island Size Rules for New Zealand Homes

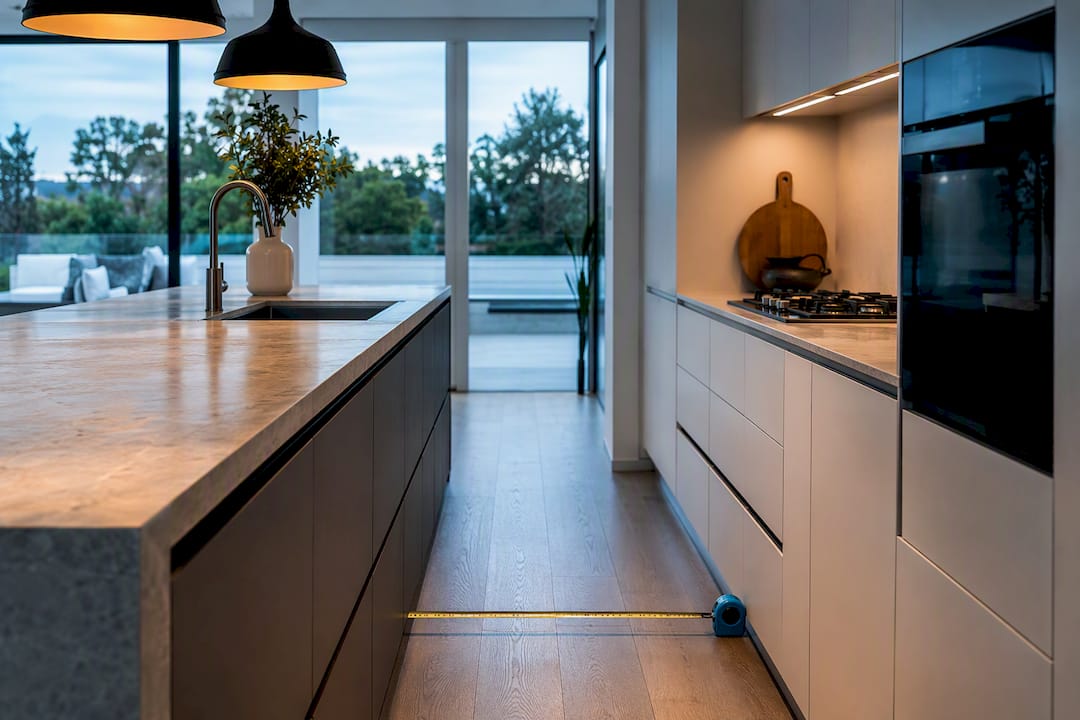
The minimum useful kitchen island size is about 1,200mm long by 600mm wide. Below that, you have a cart, not an island. Most New Zealand kitchens settle on a sweet spot of roughly 2,000mm by 900 to 1,050mm, which fits seating for two or three without crowding the room. Before you commit to any figure, check one number first: 900mm of clearance on every working side. That’s the test that decides whether an island fits your kitchen at all.
TL;DR:
Most kitchens should aim for an island size around 2,000mm by 900 to 1,050mm to balance seating, prep space, and storage without crowding.
A minimum clearance of 900mm on working sides is essential, with 1,050mm to 1,200mm recommended for multiple cooks to avoid bumping elbows.
Proper planning of appliance door swings and seating overhangs is critical to prevent circulation issues and to ensure structural support for larger benchtops.
Renovators often fail to finalize features like sinks or hobs early, leading to costly redesigns after installing the island or pouring the slab.
Full project management that coordinates all trades beforehand simplifies installation, ensures precise positioning of drains and electricals, and reduces costly mistakes.
Table of Contents
Recommended kitchen island dimensions: length, width and height ranges
An island under 1,200mm by 600mm functions more like a mobile cart than a true workstation. There’s not enough surface to prep on one end while someone plates up on the other, and you lose the storage that makes an island worth building in the first place.
Width is where function changes fastest. A 600mm bench suits prep-only islands with no plumbing or gas run to it. Once you add a sink or hob, NZ designers commonly push island width to 900mm or beyond to leave enough landing space either side of the appliance.
Length scales with what you’re asking the island to do:
1,200mm — a compact prep station, workable in smaller kitchens
2,000mm — the common sweet spot, enough for seating plus storage
2,400 to 3,000mm — a true multi-function island with room for a hob, extra storage, or four stools
Bench height sits at around 900mm as the New Zealand standard, though islands built around a hob sometimes drop to 830 to 900mm for easier pan control.
How much clearance does a kitchen island need?
Clearance is the number that makes or breaks an island layout, and it’s worth testing before you fall in love with a size. A working minimum clearance is about 900mm on any side you’ll actually use to cook or walk past. One cook alone does better with about 1,050mm, and two people working the same aisle need closer to 1,200mm to avoid bumping elbows.
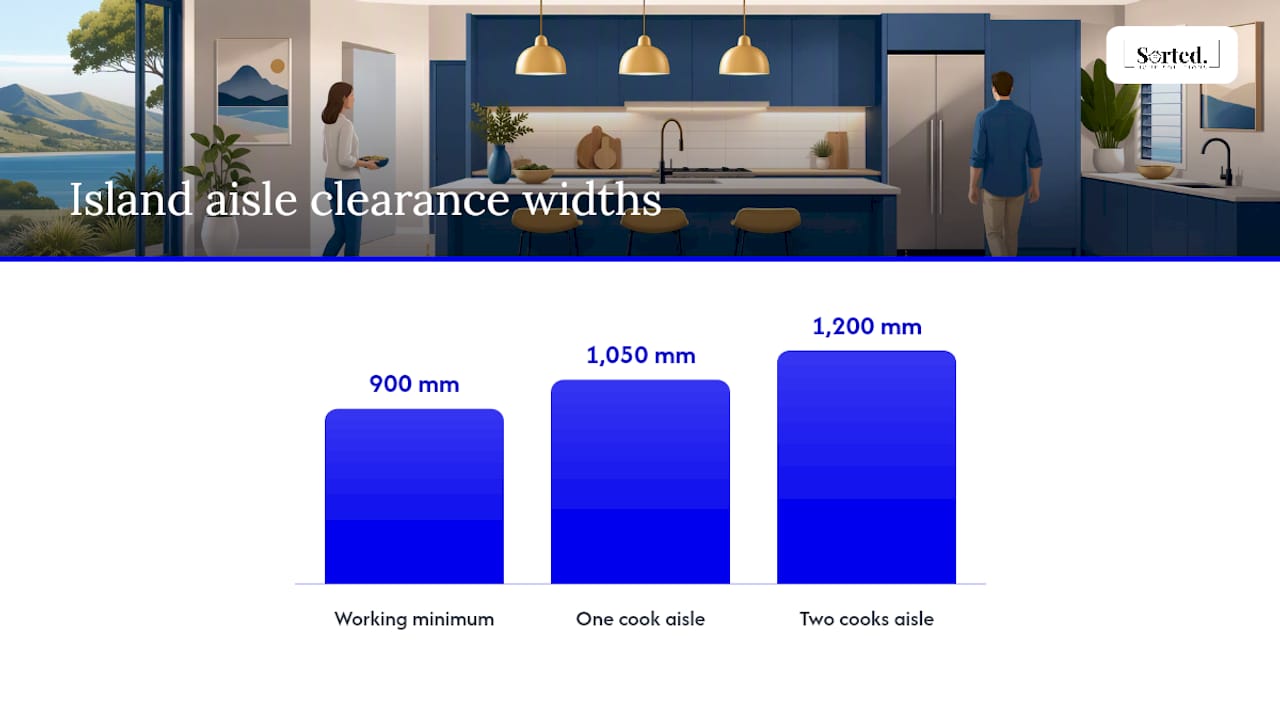
Industry clearance tables get more specific still: 36 inches for a simple walkway, 42 inches for a one-cook work aisle, and 48 inches where two cooks share the space. Appliance doors change these figures fast, since an open dishwasher or oven eats into the aisle the moment it swings open.
Run this worked example on your own floor plan:
Measure your perimeter cabinet depth (typically 600 to 650mm including benchtop overhang).
Add your chosen aisle width (900mm minimum, 1,050 to 1,200mm if two people cook together).
Add your island depth (600 to 1,200mm depending on function).
Add the matching aisle on the island’s other side.
Compare that total against your kitchen’s actual width, wall to wall.
If the sum is tighter than your room, drop the island depth or aisle width before you drop the island idea altogether.
How much seating space does a kitchen island need?
Seating changes the maths again. Designers recommend an overhang of 300 to 400mm for comfortable bar-style seating, giving knees clearance under the bench without the stool sitting miles from the surface.
Per-person width follows a simple rule: allow around 600mm of island edge for each seated person. Two stools need 1,200mm of usable edge, three need 1,800mm, and four need 2,400mm, which is why a large island and a decent stool count tend to arrive together.
Height involves a trade-off. Standard 900mm benches suit everyday dining and match your main countertop. Hob islands sometimes drop to 830 to 900mm for cooking comfort, and true bar-height islands run higher again, at the cost of matching your main bench run.
Pro Tip: If you’re mixing cooking and casual dining at the same island, keep the whole bench at standard height and add a stepped-up bar ledge for seating instead of raising the entire surface.
Checking appliance clearance around your island
Appliance doors are the detail most floor plans get wrong, because a closed dishwasher and an open one occupy very different amounts of floor space.
Dishwashers typically drop a door 550 to 600mm when opened, plus you need standing room in front to load it.
Oven doors need 750 to 900mm of clearance depending on the model, more for a double oven.
Fridges with French doors or side-by-side doors swing wider than single-door models, so check the swing radius against your island edge, not just the fridge’s footprint.
Plumbing, waste and electrical runs need locking in before you finalise island dimensions, since moving a drain line after the slab is poured gets expensive fast.
How to pick the right island size for your room
Decide the island’s job first. Prep-only, seating, sink, or hob each demand different widths and clearances, so settle this before you touch a tape measure.
Measure your perimeter cabinet depth, then calculate aisle plus island plus aisle against your kitchen’s total width, using the worked example above.
Test appliance doors and seating clearances on the same plan, factoring in dishwasher and oven swings alongside the 300 to 400mm seating overhang.
Iterate before you order. Builders commonly test placement with a drawn plan or online planner first, since this step catches circulation problems while they’re still cheap to fix.
Consider a peninsula or rolling island if the maths keeps coming up short. A fixed island isn’t the only way to add bench space in a tighter kitchen layout.
Kitchen island size cheat sheet: small, medium and large presets
Three presets cover most New Zealand kitchens, plus one option for rooms too tight for anything fixed.
Small: 1,200 × 600mm — best as a prep station or a step up from a portable cart, no plumbing required.
Medium (sweet spot): 2,000 × 900 to 1,050mm — seating for two to three, solid storage, room for a prep zone and a sink if you want one.
Large: 2,400 to 3,000 × 1,000 to 1,200mm — seating for three to four, space for a hob plus drawers on the opposite face.
Rolling island: 600 to 900mm footprint — worth choosing when the room fails the clearance test for a fixed island but you still want extra bench space some of the time.
Depths beyond around 1,200mm become hard to reach from both sides, so treat that figure as a practical ceiling rather than a target.
What renovators wish homeowners locked in earlier
Sorted Home Solutions sees the same pattern across island projects: homeowners pick a size before deciding whether the island carries a sink, hob, or seating, then have to redraw the plan once those features get added later.
Get the feature list settled first: sink, hob, seating, or none of the above. Every one of those choices shifts the width and clearance numbers, and it’s far cheaper to change a drawing than to move a drain line after the concrete’s poured.
Coordinating plumbing, electrical and extraction for an island isn’t a single trade’s job. It’s several trades working to one plan, which is exactly what full project management is built to solve. For timing and cost expectations on an island-inclusive kitchen, a typical Auckland renovation timeline and current remodel cost guide are worth reading before you brief a builder.
Kitchen island shape and how it changes your size planning
Rectangular islands are the default for good reason: they’re the easiest shape to size against a worked clearance calculation, and every dimension rule in this guide assumes a straight rectangle unless stated otherwise.
L-shaped islands trade some of that simplicity for a dedicated seating arm, which usually means one leg stays narrower (600 to 750mm, prep-focused) while the seating leg widens to accommodate the 300 to 400mm overhang plus knee room. The extra corner also eats floor space that a straight island wouldn’t, so recalculate your aisle clearance on both exposed sides, not just one.
Curved or rounded islands look striking in an open-plan kitchen but they’re the hardest shape to size accurately, because clearance isn’t a fixed distance around a curve the way it is around a straight edge. Give yourself extra margin at the widest point of the curve, since that’s where a swinging appliance door or a passing cook will actually test the space.
Round islands work best in kitchens built around a single, generous floor area rather than a tight galley. They rarely suit seating on more than two sides, so factor that into your per-person seating maths before you commit to the shape.
Whatever shape you choose, the underlying rules don’t change: clearance, appliance swing, and seating overhang still apply at every point around the island. Shape decides where those numbers get tight, not whether they matter.
Adjusting island size to fit your kitchen’s work zones
A kitchen typically splits into three zones: storage and fridge access, the sink and prep run, and the cooking zone around the hob and oven. Your island’s size should respond to where it sits relative to those three, not just to the room’s total floor area.
An island placed between the sink and the hob needs to support quick movement between the two, so keep the footprint modest and prioritise clearance over storage. An island offset to one side, away from the main workflow, can afford to grow larger and take on more of the seating and storage load instead.
If your island is doing double duty as the connector between the three-point work triangle and the dining or living space, keep both aisles it borders at the higher end of the clearance range, 1,050 to 1,200mm, since that path carries more foot traffic than a simple perimeter walkway. Workflow, more than raw square metres, should decide where you spend your clearance budget.
Island size, lighting and electrical planning
A bigger island needs more than a bigger benchtop. It needs its own lighting plan and its own power layout, and both should get decided before the joinery is confirmed, not after.
Pendant lights over an island are typically spaced to the island’s centre line, so a length change shifts every fitting position. A 1,200mm island might take a single pendant; a 2,400 to 3,000mm island usually wants two or three spaced evenly along the run, which means the ceiling wiring has to be planned to match the final length, not an early guess at it.
Power is just as size-dependent. Longer islands with seating or a hob usually need power points built into the island itself, positioned to avoid clashing with stool placement or appliance clearance. Waiting until the island size is locked in avoids cutting a bench for a socket that ends up in the wrong spot. A tailored lighting plan drawn against the final island dimensions, rather than an early sketch, saves a second round of electrical work later in the project.
Materials and structural support for larger islands
Once an island grows past around 2,400mm, the benchtop material and its support start to matter as much as the floor plan. Stone benchtops in particular need a support structure underneath, not just cabinetry, because unsupported overhangs beyond roughly 300 to 400mm can crack under weight over time.
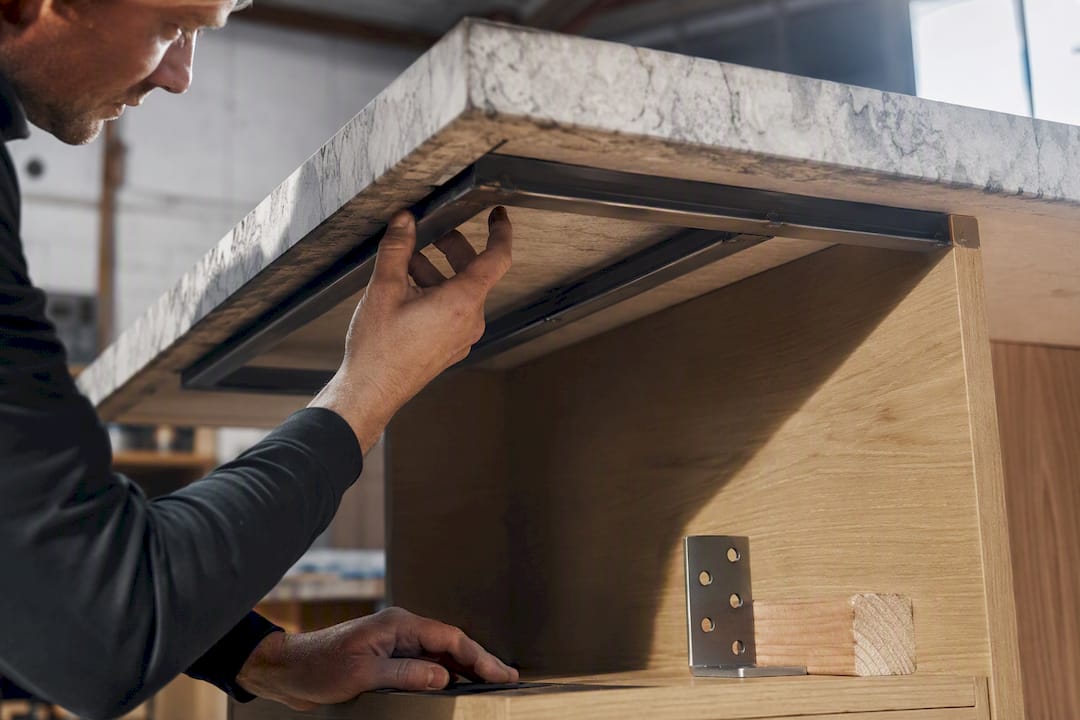
Waterfall edges, where the benchtop material runs down the side of the island rather than stopping at the edge, add both weight and cost, and they need the cabinetry underneath built to carry that load rather than just look the part. Timber and engineered stone behave differently under the same span, so the material choice and the structural bracing should be decided together, not the benchtop after the frame’s already built.
Seating overhangs are the other structural pressure point. A 300 to 400mm overhang carrying stool weight and the odd knock from a knee needs corbels, a steel frame, or a cabinet extension underneath, not just an unsupported slab. Skipping that support is a common cause of benchtop cracking a year or two after installation, well after the renovation’s finished and the trades have moved on.
What most people get wrong before the island’s even ordered
Two mistakes come up again and again. The first is drawing the island at a size that looks right on paper before anyone measures the actual aisle widths around it. The second is adding seating as an afterthought, once the benchtop’s already ordered, which forces an overhang that’s either too shallow to sit at comfortably or too deep to support without extra bracing.
A rough sketch on paper catches some of this, but a proper 3D plan or a walk-through with a renovator catches circulation problems a flat drawing misses entirely, particularly where an open dishwasher door or a swinging fridge door crosses a walkway you assumed was clear. Measure your aisles before you fall in love with a size, run the numbers against your appliance doors, and if the maths feels tight, talk it through with someone who’s fitted islands into awkward New Zealand kitchens before.
— Rudi
Get your island-inclusive kitchen renovation sorted
A full-service renovation company offers an alternative to juggling separate builders, plumbers and electricians yourself, providing all trades and one point of contact managing your island from first sketch to final consent sign-off, so the plumbing, electrical and extraction work behind your new bench actually lines up on install day.

Getting an island size right on paper is one thing. Getting the drainage, gas, and power run to land exactly where the joinery expects them is another, and that’s where full project management earns its place. The service coordinates every trade against one confirmed set of dimensions, handling the building consent process alongside the physical work so nothing gets built twice.
If you’re ready to see what an island-inclusive kitchen costs in practice, check the kitchen renovation pricing page for typical packages, browse a full home renovation if the island is part of a bigger project, or send through your floor plan on the inquiry page to get a straight answer on what will fit.
Sources
How much kitchen island clearance do you really need - Captivating Cabinets Blog
Everything you need to know when installing a kitchen island - Your Home and Garden NZ
Kitchen Island Ideas: Layout, Seating and Sizing Rules - Deelux Kitchens
Key measurements to consider when designing the perfect kitchen island - Houzz NZ
Recommended
Comments